Assignments for the week:
1) Read "An Introduction to Photography in the Early 20th Century and respond to the questions.
2) three new terms (over-the-shoulder, low angle and high angle. Submitting 6 images, demonstrating your understanding.
3) Photographing people tips and practice.
***************************************************************************
Last week we looked at some 19th century background work; now we are moving into the 20th century.
An Introduction to Photography in the Early 20th Century
Photography undergoes extraordinary changes in the early part of the twentieth century. This can be said of every other type of visual representation, however, but unique to photography is the transformed perception of the medium. In order to understand this change in perception and use—why photography appealed to artists by the early 1900s, and how it was incorporated into artistic practices by the 1920s—we need to start by looking back.
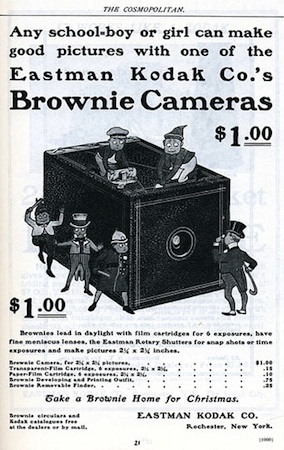
In the later nineteenth century, photography spread in its popularity, and inventions like the Kodak #1 camera (1888) made it accessible to the upper-middle class consumer; the Kodak Brownie camera, which cost far less, reached the middle class by 1900.
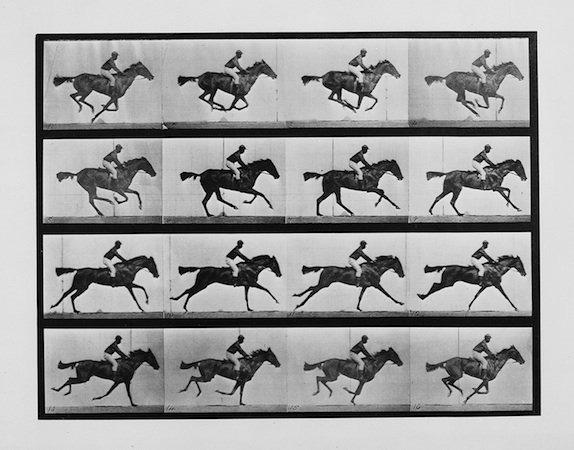
In the sciences (and pseudo-sciences), photographs gained credibility as objective evidence because they could document people, places, and events. Photographers like Eadweard Muybridge created portfolios of photographs to measure human and animal locomotion. His celebrated images recorded incremental stages of movement too rapid for the human eye to observe, and his work fulfilled the camera’s promise to enhance, or even create new forms of scientific study.
In the arts, the medium was valued for its replication of exact details, and for its reproduction of artworks for publication. But photographers struggled for artistic recognition throughout the century. It was not until in Paris’s Universal Exposition of 1859, twenty years after the invention of the medium, that photography and “art” (painting, engraving, and sculpture) were displayed next to one another for the first time; separate entrances to each exhibition space, however, preserved a physical and symbolic distinction between the two groups. After all, photographs are mechanically reproduced images: Kodak’s marketing strategy (“You press the button, we do the rest,”) points directly to the “effortlessness” of the medium.
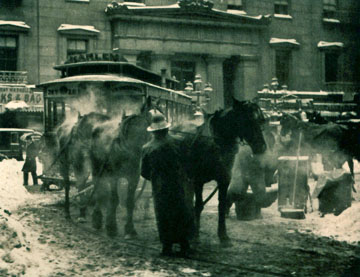
Since art was deemed the product of imagination, skill, and craft, how could a photograph (made with an instrument and light-sensitive chemicals instead of brush and paint) ever be considered its equivalent? And if its purpose was to reproduce details precisely, and from nature, how could photographs be acceptable if negatives were “manipulated,” or if photographs were retouched? Because of these questions, amateur photographers formed casual groups and official societies to challenge such conceptions of the medium. They—along with elite art world figures like Alfred Stieglitz—promoted the late nineteenth-century style of “art photography,” and produced low-contrast, warm-toned images like The Terminal that highlighted the medium’s potential for originality.
So what transforms the perception of photography in the early twentieth century? Social and cultural change—on a massive, unprecedented scale.Like everyone else, artists were radically affected by industrialization, political revolution, trench warfare, airplanes, talking motion pictures, radios, automobiles, and much more—and they wanted to create art that was as radical and “new” as modern life itself.
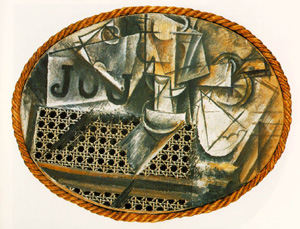
If we consider the work of the Cubists and
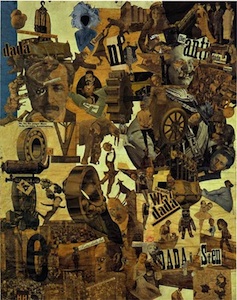
Futurists, we often think of their works in terms of simultaneity and speed, destruction and reconstruction. Dadaists, too, challenged the boundaries of traditional art with performances, poetry, installations, and photomontage that use the materials of everyday culture instead of paint, ink, canvas, or bronze.
By the early 1920s, technology becomes a vehicle of progress and change, and instills hope in many after the devastations of World War I. For avant-garde (“ahead of the crowd”) artists, photography becomes incredibly appealing for its associations with technology, the everyday, and science—precisely the reasons it was denigrated a half-century earlier. The camera’s technology of mechanical reproduction made it the fastest, most modern, and arguably, the most relevant form of visual representation in the post-WWI era. Photography, then, seemed to offer more than a new method of image-making—it offered the chance to change paradigms of vision and representation.
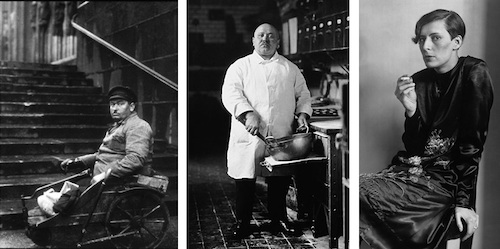
With August Sander’s portraits such as Disabled Man, Pastry Chef, or Secretary at a Radio Station, Cologne, we see an artist attempting to document—systematically—modern types of people, as a means to understand changing notions of class, race, profession, ethnicity, and other constructs of identity. Sander transforms the practice of portraiture with these sensational, arresting images. These figures reveal as much about the German professions as they do about self-image.
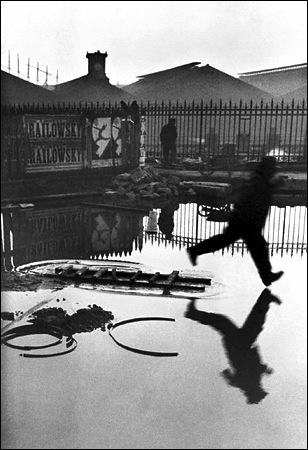
Cartier-Bresson’s leaping figure in Behind the Gare St. Lazare reflects the potential for photography to capture individual moments in time—to freeze them, hold them, and recreate them. Because of his approach, Cartier-Bresson is often considered a pioneer of photojournalism. This sense of spontaneity, of accuracy, and of the ephemeral corresponded to the racing tempo of modern culture (think of factories, cars, trains, and the rapid pace of people in growing urban centers).
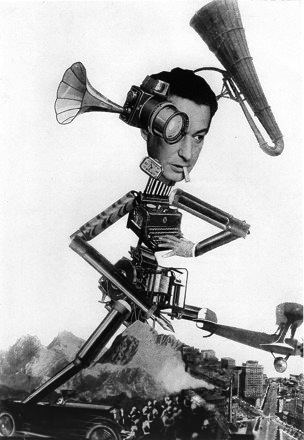
Umbo’s photomontage The Roving Reporter shows how modern technologies transform our perception of the world—and our ability to communicate within it. His camera-eyed, colossal observer (a real-life journalist named Egon Erwin Kisch) demonstrates photography’s ability to alter and enhance the senses. In the early twentieth-century, this medium offered a potentially transformative vision for artists, who sought new ways to see, represent, and understand the rapidly changing world around them.
Essay by Dr. Juliana Kreinik
Questions relating to the above material.
1. What was the importance of the Kodak 1 camera of 1888 and the Brownie of 1900?
2. Why did photographs gain credibility?
3.What was the conflict between art and photography?
4. What were some of the social and political changes that affected artists and photographers?
5. How was portrait photography used to systematically used to document people?
6. Why is Henri Cartier-Bresson considered a "pioneer of photojournalism"?
7. Look at Umbo's Roving Reporter. In what ways, has the reporter linked to his environment? Respond in full sentences and specifics from the image.
_________________________________________________________
Assignment 2:
At this point you should be familiar with the following: rule of thirds, phi grid, Fibonacci spiral, texture, symmetry, depth of field, lines and patterns.
Our new terms are over-the-shoulder shot, low angle and high angle shots.
Read / Look carefully at the examples and take demonstrate your understanding with two of your own examples; that is 2 over-the-shoulder shots, two low angle shots and two high angle shots.
The over-the-shoulder shot
over the shoulder shot (also over shoulder OTS, or third-person shot) is a shot of someone or something taken from the perspective or camera angle from the shoulder of another person.
The low angle shot
The low-angle shot, is a shot from a camera angle positioned low on the vertical axis, anywhere below the eye line, looking up. Sometimes, it is even directly below the subject's feet. Psychologically, the effect of the low-angle shot is that it makes the subject look strong and powerful.
The high angle shot
A high-angle shot is a technique where the camera looks down on the subject from a high angle and the point of focus often gets "swallowed up." High-angle shots can make the subject seem vulnerable or powerless when applied with the correct mood, setting, and effects.
________________________________________________________________
Assignment 3: Read and look carefully below at the some of the techniques used to take pictures of people.
To demonstrate your understanding, take 6 pictures. Under each write a sentence or two that explains what photography tip you were employing and to whether you think the your goal was successful.
SOME HOW TOs
People and Portrait Photography Tips
People pictures fall into two categories: portraits and candid. Either can be made with or without your subject's awareness and cooperation.
However near or far your subject, however intimate or distant the gaze your camera casts, you always need to keep in mind the elements of composition and the technique that will best help you communicate what you are trying to say.
1. Get Closer
The most common mistake made by photographers is that they are not physically close enough to their subjects. In some cases this means that the center of interest—the subject—is just a speck, too small to have any impact. Even when it is big enough to be decipherable, it usually carries little meaning. Viewers can sense when a subject is small because it was supposed to be and when it's small because the photographer was too shy to get close.
2. Settings—The Other Subject
The settings in which you make pictures of people are important because they add to the viewer's understanding of your subject. The room in which a person lives or works, their house, the city street they walk, the place in which they seek relaxation—whatever it is, the setting provides information about people and tells us something about their lives. Seek balance between subject and environment. Include enough of the setting to aid your image, but not so much that the subject is lost in it.
3. Candids: Being Unobtrusive
You may want to make photographs of people going about their business—vendors in a market, a crowd at a sports event, the line at a theater. You don't want them to appear aware of the camera. Many times people will see you, then ignore you because they have to concentrate on what they are doing. You want the viewers of the image to feel that they are getting an unguarded, fly-on-the-wall glimpse into the scene.
There are several ways to be unobtrusive. The first thing, of course, is to determine what you want to photograph. Perhaps you see a stall in a market that is particularly colorful, a park bench in a beautiful setting—whatever has attracted you. Find a place to sit or stand that gives you a good view of the scene, take up residence there, and wait for the elements to come together in a way that will make your image.
If you're using a long lens and are some distance from your subject, it will probably be a while before the people in the scene notice you. You should be able to compose your image and get your shot before this happens. When they do notice you, smile and wave. There's a difference between being unobtrusive and unfriendly. Another way to be unobtrusive is to be there long enough so that people stop paying attention to you. If you are sitting at a café order some coffee and wait. As other patrons become engrossed in conversations or the paper, calmly lift the camera to your eye and make your exposure.
4. Shoot from their eye level or higher, and at an angle
For the most flattering set-up, shoot at their same eye level or above. Taking pictures of someone straight on is both unflattering and uninteresting. Asking them to twist at the waist, shoulders, or neck and not face their body square-on, but rather follow their face’s direction will not only be much more forgiving to any subject. Every single human has one eye that is smaller than the other.



No comments:
Post a Comment