Culturally Sensitive Social Distancing in Yukon, Canada
********************************************************************
You'll find below some of the photos your classmates have sent that demonstrate symmetry, texture, pattern, depth of field and line. Please scroll down. You'll find them after this week's assignments. These are not all the photos received but a partial selection. Thank you!
This week we are 1) looking at the early history of photography.
(short reading and questions)
2) Social Realism photos from the Eastman
House Museum (paragragh response)
3) Looking to See. Your new vocabulary is close ups, medium shots and establishing shots, as well as the terms horizontal and vertical. You will be identifying 25 images as to the type of shot, whether it is horizontal or vertical and one other salient feature that we have covered these last two weeks. Go to Assignment 3, which comes after the Social Realism images below. There you will find more details. If you have any difficulties, please let me know.
Assignment 1: Please read the Early Photography and answer the following questions:
1) What two factors make a tension that make it difficult to classify photography as an art?
2) When did the chemistry of creating photos become available?
3) What was the purpose of the camera obscura?
4) How long was the exposure needed for the very first photograph in 1826?
5) What was one of the challenges in making the first photographs and how was it solved?
6) What was the problem with a daguerrotype?
7) Why created the first paper negatives? What was the advantage here?
8) Explain the plus and minuses of the collodion method, which was used during the American Civil War.
9) What happened once the exposure time could be reduced to 1/25th of a second?
10. What was George Eastman's invention and how did it transform photograpy? (The second half of this question is not in the reading; think!)
:max_bytes(150000):strip_icc()/Fenton-photo-van-56a488933df78cf77282dd15.jpg)

Close up tip:
Go to any spot of nature, such as a garden, an empty lot or a park, and arbitrarily pick a small area (20x20 feet is good). Then spend an hour there finding close-ups.
Medium Shot: The medium shot is a general, all-purpose shot. It allows the viewer to pick up on movements and gestures. Body language is important to conveying emotion, and the medium shot remains close enough to capture that emotion. The subject is in the middle distance, permitting some of the background to be seen.
Establishing Shot: a shot to orient the viewer and establish a sense of place. They are way to establish mood and viewpoints.
YOUR TURN NOW. For each of the 25 photos, identify the type of shot, whether is is formatted horizontally or vertically and one specific aspect of line, symmetry, texture, pattern or depth of field. Make sure to support your choice with something specific to the photo.


7.

8.
9

10.

11.

12.

13.

14.

15.
16.

17

18.
19.

20

21
22.

23.
24

25.

******************************************************
Student Photos


********************************************************************
Photographers use their cameras as tools of exploration, passports to inner sanctums, instruments for change. Robert Draper, National Geographic Photographer.
You'll find below some of the photos your classmates have sent that demonstrate symmetry, texture, pattern, depth of field and line. Please scroll down. You'll find them after this week's assignments. These are not all the photos received but a partial selection. Thank you!
This week we are 1) looking at the early history of photography.
(short reading and questions)
2) Social Realism photos from the Eastman
House Museum (paragragh response)
3) Looking to See. Your new vocabulary is close ups, medium shots and establishing shots, as well as the terms horizontal and vertical. You will be identifying 25 images as to the type of shot, whether it is horizontal or vertical and one other salient feature that we have covered these last two weeks. Go to Assignment 3, which comes after the Social Realism images below. There you will find more details. If you have any difficulties, please let me know.
Assignment 1: Please read the Early Photography and answer the following questions:
1) What two factors make a tension that make it difficult to classify photography as an art?
2) When did the chemistry of creating photos become available?
3) What was the purpose of the camera obscura?
4) How long was the exposure needed for the very first photograph in 1826?
5) What was one of the challenges in making the first photographs and how was it solved?
6) What was the problem with a daguerrotype?
7) Why created the first paper negatives? What was the advantage here?
8) Explain the plus and minuses of the collodion method, which was used during the American Civil War.
9) What happened once the exposure time could be reduced to 1/25th of a second?
10. What was George Eastman's invention and how did it transform photograpy? (The second half of this question is not in the reading; think!)
Early Photography: Niépce, Talbot and Muybridge
By modern standards, nineteenth-century photography can appear rather primitive. While the stark black and white landscapes and unsmiling people have their own austere beauty, these images also challenge our notions of what defines a work of art.
Photography is a controversial fine art medium, simply because it is difficult to classify—is it an art or a science? Nineteenth century photographers struggled with this distinction, trying to reconcile aesthetics with improvements in technology.
The Birth of Photography
Although the principle of the camera was known in antiquity, the actual chemistry needed to register an image was not available until the nineteenth century.
Artists from the Renaissance onwards used a camera obscura (Latin for dark chamber), or a small hole in the wall of a darkened box that would pass light through the hole and project an upside down image of whatever was outside the box. However, it was not until the invention of a light sensitive surface by Frenchman Joseph Nicéphore Niépce that the basic principle of photography was born.
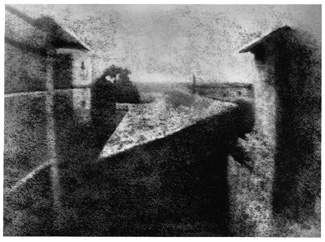
From this point the development of photography largely related to technological improvements in three areas, speed, resolution and permanence. The first photographs, such as Niépce’s famous View from the Window at Gras (1826) required a very slow speed (a long exposure period), in this case about 8 hours, obviously making many subjects difficult, if not impossible, to photograph. Taken using a camera obscura to expose a copper plate coated in silver and pewter, Niépce’s image looks out of an upstairs window, and part of the blurry quality is due to changing conditions during the long exposure time, causing the resolution, or clarity of the image, to be grainy and hard to read. An additional challenge was the issue of permanence, or how to successfully stop any further reaction of the light sensitive surface once the desired exposure had been achieved. Many of Niépce’s early images simply turned black over time due to continued exposure to light. This problem was largely solved in 1839 by the invention of hypo, a chemical that reversed the light sensitivity of paper.
Technological Improvements
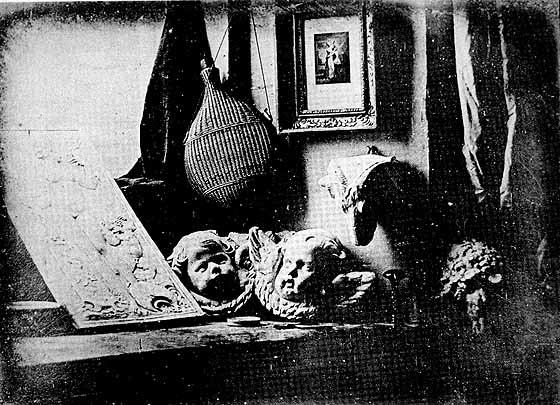
Photographers after Niépce experimented with a variety of techniques. Louis Daguerre invented a new process he dubbed a daguerrotype in 1839, which significantly reduced exposure time and created a lasting result, but only produced a single image.
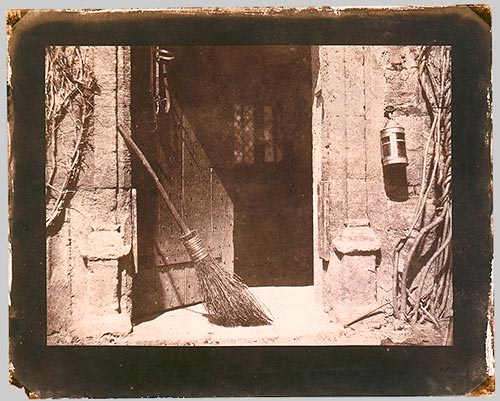
At the same time, Englishman William Henry Fox Talbot was experimenting with what would eventually become his calotype method, patented in February 1841. Talbot’s innovations included the creation of a paper negative, and new technology that involved the transformation of the negative to a positive image, allowing for more than one copy of the picture. The remarkable detail of Talbot’s method can be see in his famous photograph, The Open Door (1844) which captures the view through a medieval-looking entrance. The texture of the rough stones surrounding the door, the vines growing up the walls and the rustic broom that leans in the doorway demonstrate the minute details captured by Talbot’s photographic improvements.
The collodion method was introduced in 1851. This process involved fixing a substance known as gun cotton onto a glass plate, allowing for an even shorter exposure time (3-5 minutes), as well as a clearer image.
:max_bytes(150000):strip_icc()/Fenton-photo-van-56a488933df78cf77282dd15.jpg)
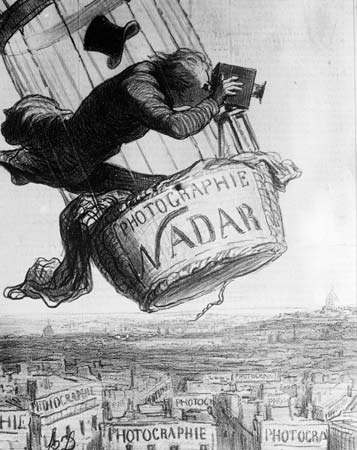
The big disadvantage of the collodion process was that it needed to be exposed and developed while the chemical coating was still wet, meaning that photographers had to carry portable darkrooms to develop images immediately after exposure. Both the difficulties of the method and uncertain but growing status of photography were lampooned by Honoré Daumier in his Nadar Elevating Photography to the Height of Art (1862). Nadar, one of the most prominent photographers in Paris at the time, was known for capturing the first aerial photographs from the basket of a hot air balloon. Obviously, the difficulties in developing a glass negative under these circumstances must have been considerable.
Further advances in technology continued to make photography less labor intensive. By 1867 a dry glass plate was invented, reducing the inconvenience of the wet collodion method.
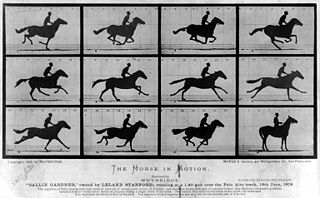
Prepared glass plates could be purchased, eliminating the need to fool with chemicals. In 1878, new advances decreased the exposure time to 1/25th of a second, allowing moving objects to be photographed and lessening the need for a tripod. This new development is celebrated in Eadweard Maybridge’s sequence of photographs called Galloping Horse (1878). Designed to settle the question of whether or not a horse ever takes all four legs completely off the ground during a gallop, the series of photographs also demonstrated the new photographic methods that were capable of nearly instantaneous exposure.
Finally in 1888 George Eastman developed the dry gelatin roll film, making it easier for film to be carried. Eastman also produced the first small inexpensive cameras, allowing more people access to the technology.
Photographers in the 19th century were pioneers in a new artistic endeavor, blurring the lines between art and technology. Frequently using traditional methods of composition and marrying these with innovative techniques, photographers created a new vision of the material world. Despite the struggles early photographers must have had with the limitations of their technology, their artistry is also obvious.
********************************************************
Part 2 Assignment: There are nine photos below from the George Eastman Museum.
Look over the photos below and select 1 that particularly resonates with you. In now fewer than 200 words, describe the image as precisely as you can. LOOK CLOSELY and SEE and then explain what in how the photographer has captured such an affecting, powerful image. (writing grade)
Note: Social realism is the term used for work produced by painters, printmakers, photographers, writers and filmmakers that aims to draw attention to the real socio-political conditions of the working class as a means to critique the power structures behind these conditions.
Photographers were commissioned by the Farm Security Administration (FSA) to document rural poverty and exploitation of sharecroppers and migrant labourers in an attempt to garner support for President Franklin D. Roosevelt’s New Deal. The photographs were distributed free of charge to newspapers across the country and brought the plight of displaced farming communities to the public’s attention.
SOCIAL REALISM PHOTOGRAPHS FROM THE GEORGE EASTMAN HOUSE
Damaged Child, Shaketown Oklahoma by Dorothea Lange
Red Jackson by Gordon Parks
Former slave with long memory, Alabama 1937 by Dorothea Lange
Roadside stand, vicinity Birmingham, Alabama
Walker Evans 1936
Group at church meeting by Doris Ulman
Paul Robeson (famous actor) by Edward Steichen
Savoy Dancers by Aaron Siskind
Dust Storm Okalahoma
by Arthur Rothstein
Railroad Car Worker by Lewis Hine 1920
***************************************************************************
Assignment Part 3: Begin by carefully reading the definition behind the three basic types of shots: close up, medium or establishing/ long shot. Look carefully at the exemplars.
When you are comfortable with understanding the differences among the three, look (see!) at the 25 images that follow the exemplars. For each: identify whether the photographer has framed the picture as horizontal or vertical.
Then identify the type of shot and finally select one of the following: texture, symmetry, pattern, line or depth of field and explain how it is used in the image. One sentence will suffice, but reference some specific aspect of the photo.
Close ups:
A close-up or closeup is a type of shot, which tightly frames a person or an object.Close up tip:
Go to any spot of nature, such as a garden, an empty lot or a park, and arbitrarily pick a small area (20x20 feet is good). Then spend an hour there finding close-ups.
Medium Shot: The medium shot is a general, all-purpose shot. It allows the viewer to pick up on movements and gestures. Body language is important to conveying emotion, and the medium shot remains close enough to capture that emotion. The subject is in the middle distance, permitting some of the background to be seen.
Establishing Shot: a shot to orient the viewer and establish a sense of place. They are way to establish mood and viewpoints.
YOUR TURN NOW. For each of the 25 photos, identify the type of shot, whether is is formatted horizontally or vertically and one specific aspect of line, symmetry, texture, pattern or depth of field. Make sure to support your choice with something specific to the photo.
1.

2. 

3.

4.

5.

6. 

7.

8.

9

10.

11.

12.

13.

14.

15.

16.

17

18.

19.

20

21

22.

23.

24

25.

******************************************************
Student Photos




No comments:
Post a Comment